Compost tea is a liquid microbial inoculant that can be applied to leaves or soil. Brewing it correctly with active aeration helps multiply beneficial bacteria and fungi, providing a quick biological boost for your garden crops. Let's review the equipment and ingredients needed for a successful brew.
Soil Chemistry, Minerals, and Cation Exchange Capacity
To establish a highly productive organic vegetable garden under the DHIDEE AGRO methodology, you must understand the physical and chemical properties of soil. Soil is not a static medium; it is a complex geological and biological matrix consisting of mineral particles, organic matter, water, and air. The mineral base of soil is divided into three distinct particle classes based on size: sand, silt, and clay. Sand particles are the largest, ranging from 0.05 to 2.0 millimeters in diameter. Sandy soils possess large pore spaces, which allow water and air to move rapidly through the profile. However, this quick movement means sandy soils have poor water retention and are highly susceptible to leaching, where water-soluble nutrients are washed down below the root zone. Clay particles are the smallest, measuring less than 0.002 millimeters. Clay soils have massive surface areas with tiny pore spaces. This allows clay to hold large volumes of water, but it makes clay highly prone to compaction. When clay soil compacts, it loses its pore space, cutting off the oxygen supply to plant roots and causing waterlogging, which leads to root rot.
The nutrient-holding capacity of your garden is determined by its Cation Exchange Capacity (CEC). Clay and fully decomposed organic matter (humus) have negatively charged surfaces. These surfaces attract positively charged minerals like potassium, magnesium, calcium, and ammonium. Plant roots exchange hydrogen ions for these essential minerals as they grow. To improve low-CEC soils, typical of sandy areas, growers must focus on building soil carbon. Regularly applying finished compost and green manure crops builds humus, increasing the number of nutrient-binding sites and ensuring your crops have access to minerals throughout the season. Higher soil carbon levels directly translate to a more stable, self-regulating biological system.
The acidity or alkalinity of your soil, measured as pH, determines the chemical form of soil nutrients. A neutral pH of 6.5 is ideal for most vegetable varieties. In highly acidic soils, key nutrients like phosphorus and calcium bind to iron, making them unavailable to plants. In alkaline soils, micronutrients like iron and zinc lock up. Using natural minerals like dolomite lime for acidic soils or elemental sulfur for alkaline soils helps adjust pH slowly and safely. Composting also buffers pH, protecting plant roots from drastic shifts and maintaining microbial activity.
Nurturing the Soil Food Web in Your Root Zone
The rhizosphere is the narrow zone of soil directly influenced by root secretions. It is one of the most biologically active areas on Earth. Plants pump sugars, amino acids, and organic acids out of their roots to feed bacteria and fungi. In return, these microorganisms protect roots from pathogens and convert minerals into forms plants can absorb. This relationship forms the basis of the soil food web, where bacteria, fungi, protozoa, and earthworms work together to cycle nutrients and maintain soil structure, supporting plant health and vigor.
Bacteria and fungi are the primary decomposers in the soil food web. They consume organic matter, storing nutrients in their cellular structures. Bacteria are highly efficient at breaking down simple sugars and green plant matter, while fungi specialize in breaking down complex lignin and cellulose found in woody materials. Mycorrhizal fungi form a particularly close relationship with vegetable crops. The fungal threads, or hyphae, penetrate the outer cells of plant roots, forming structures called arbuscules. This network extends far beyond the plant’s root zone, increasing the root surface area by up to 1000%. The mycorrhizal network travels through tiny soil pores to access water and phosphorus that the plant roots cannot reach, transporting these resources directly to the host plant in exchange for sugars. The fungal hyphae also secrete a sticky glycoprotein called glomalin, which binds micro-aggregates of soil into stable macro-aggregates, creating a crumbly soil structure that resists erosion and compaction.
As protozoa, beneficial nematodes, and micro-arthropods feed on bacteria and fungi, they release stored nutrients back into the soil. Because these predators require very little nitrogen, they excrete the excess as ammonium, which plants can absorb immediately. Synthetic fertilizers bypass this natural cycle, delivering mineral salts that can dehydrate and kill soil microbes. This disrupts the food web and makes plants dependent on chemical inputs, leaving them open to disease.
Composting Science: C:N Ratios and Thermophilic Aeration
High-quality compost is built on a balanced C:N ratio. Target roughly 30 parts carbon to 1 part nitrogen. Carbon materials supply structure and energy, while nitrogen-rich green waste provides the proteins that fuel microbial growth. Getting this balance right helps the pile decompose quickly without smelling, providing excellent organic matter for your soil.
Too much carbon slows decomposition because microbes lack the nitrogen to build their populations. Too much nitrogen causes the pile to smell like ammonia as excess gas escapes. The pile’s moisture should be kept around 50-60%, similar to a damp sponge. If it dries out, decomposition stops; if it gets too wet, it goes anaerobic, creating bad odors and harboring pathogens. Maintaining correct moisture is a key factor.
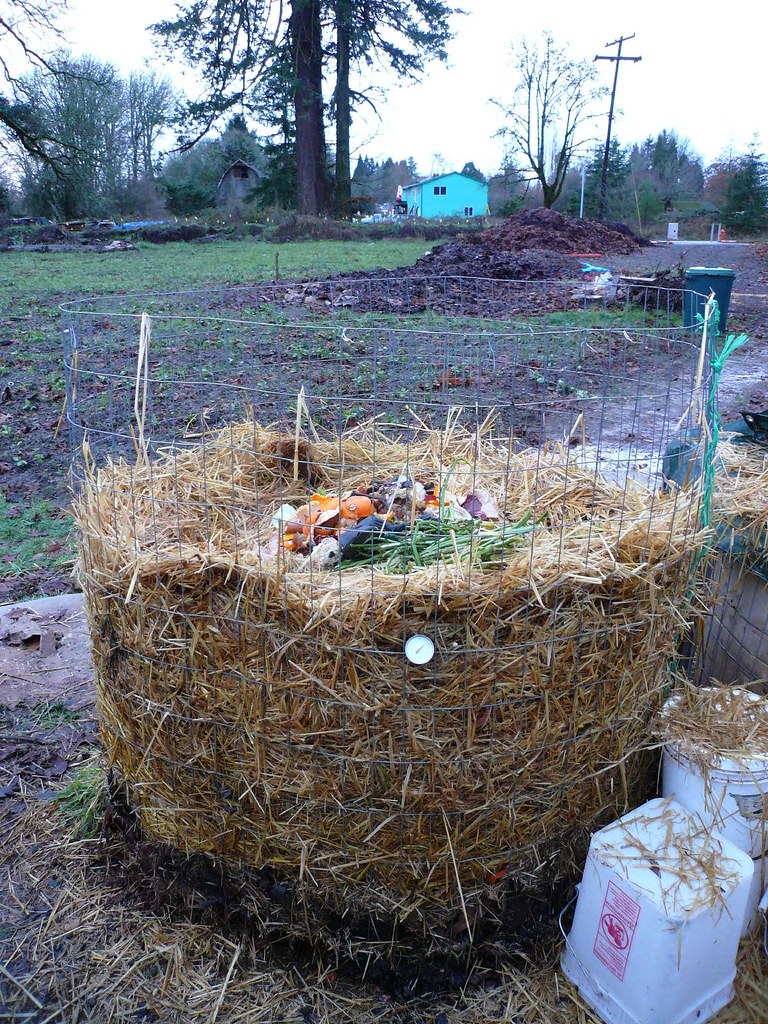
To compost efficiently and kill weed seeds and pathogens, use the thermophilic (hot) composting method. A hot compost pile must be at least 3 feet wide, 3 feet long, and 3 feet high to insulate the core. As mesophilic bacteria consume easy-to-digest sugars, their activity raises the pile temperature. Once the temperature exceeds 104 degrees Fahrenheit, thermophilic bacteria (such as Bacillus subtilis and actinomycetes) take over, pushing the core temperature to 135-160 degrees Fahrenheit. Maintaining these temperatures for at least 15 consecutive days kills pathogen spores, insect larvae, and weed seeds. The pile must be turned regularly using a fork to move materials from the outer edges to the hot center and introduce fresh oxygen. Applying finished compost adds organic matter, introduces beneficial microbes, and improves soil water retention.
How to Brew and Apply Aerated Compost Tea
Aerated Compost Tea is a liquid solution used to spray leaves or drench soil with beneficial microbes. By brewing compost in aerated water, we multiply the bacteria and fungi present. This liquid tea helps protect plants from diseases and improves soil microbiology. To brew it, you need a bucket, an air pump with bubbler stones, a mesh bag, and microbial foods, ensuring the environment remains oxygenated.
Feed your tea based on the crops you are growing. Bacterial teas, brewed with molasses, support leafy greens. Fungal teas, brewed with kelp and humic acid, support tomatoes and peppers. Use dechlorinated water and brew for 24-36 hours with continuous aeration to achieve the correct balance of biology.
Healthy compost tea has a pleasant, earthy scent. If it smells bad, it has gone anaerobic and should not be used on plants. Apply the brew within 4 hours of turning off the pump using a clean sprayer. Spray during the cool parts of the day to protect the beneficial microbes from sunlight and ensure leaf colonization.
Companion Planting: Strategic Crop Association and Allelopathy
Companion planting involves placing compatible crops together to support each other’s growth. This practice improves pest management, space efficiency, and soil health. An example is the “Three Sisters” planting: corn acts as a trellis, beans add nitrogen to the soil, and squash leaves shade the ground to suppress weeds and hold moisture, demonstrating a natural symbiotic design.
Pest management is another key benefit of companion planting. Aromatic companion plants, such as basil, garlic, chives, mint, and marigolds, release volatile organic compounds (VOCs) that mask the scent of host plants, helping protect crops from pests. Marigolds also produce alpha-terthienyl from their roots, a compound that suppresses harmful root-knot nematodes in the soil. Planting companion flowers like alyssum, dill, fennel, and yarrow attracts beneficial insects (ladybugs, lacewings, hoverflies) that prey on pests like aphids and thrips.
Some plants release growth-inhibiting chemicals into the soil, a process called allelopathy. Fennel, for example, can stunt nearby vegetables and is best grown separately. Avoid planting tomatoes near walnut trees due to juglone toxicity. Grouping compatible plants supports a healthy garden and keeps plants growing strong.
Crop Rotation: Preventing Soil Diseases and Balancing Nutrients
Growing the same crop family in the same soil year after year depletes specific nutrients and allows soil-borne diseases and pests to accumulate. Crop rotation is the practice of rotating different botanical families through your garden beds over a multi-year cycle. This disrupts pest and disease lifecycles by removing their host plants. It also helps maintain balanced soil fertility, as different plant families have different nutrient requirements.
A standard 4-bed crop rotation system groups vegetables into four main categories:
1. **Legumes (Fabaceae):** Beans and peas, which work with rhizobia bacteria in the soil to fix atmospheric nitrogen, leaving the soil enriched.
2. **Heavy Feeders (Brassicaceae & Solanaceae):** Cabbages, broccoli, tomatoes, and peppers, which require large amounts of nitrogen and phosphorus.
3. **Guzzlers (Cucurbitaceae):** Squash, cucumbers, and melons, which thrive on organic matter but need less nitrogen than brassicas.
4. **Light Feeders (Apiaceae & Amaryllidaceae):** Carrots, parsnips, onions, and garlic, which grow well in soil with lower nutrient levels.
Following this rotation helps prevent nutrient depletion and maintains healthy soil naturally.
To implement this system, divide your garden into four zones and move each crop group to the next zone each season. Keep detailed records of your plantings to avoid mistakes. Combining crop rotation with cover cropping during the off-season helps protect the soil, adds organic matter, and keeps the soil biology active throughout the year, setting your garden up for success in the spring.
IPM Strategies: Physical Protection and Organic Sprays
IPM combines multiple strategies to manage pests safely. Physical barriers are the first defense. Row covers protect brassicas and salad greens from flying insects without using chemical sprays. Cardboard collars placed around seedling stems help prevent cutworm damage during the critical early transplant stage.
To control crawling pests like slugs and snails, use barriers that disrupt their movement. Diatomaceous earth (DE) is a powder made from fossilized diatoms. Its sharp microscopic edges cut the exoskeletons of soft-bodied insects, causing them to dehydrate. DE must be reapplied after rain, as moisture renders it ineffective. Copper tape placed around raised beds creates a tiny electrostatic charge that deters slugs from crossing. These physical barriers form the first line of defense in an organic Integrated Pest Management (IPM) system.
When physical and biological controls are not enough, organic sprays can be used as a last resort. Insecticidal soaps and horticultural oils work by coating the bodies of soft-bodied insects like aphids, spider mites, and whiteflies, causing them to suffocate. Neem oil, extracted from the seeds of the neem tree, contains azadirachtin, which disrupts the growth and feeding cycles of pests. These organic treatments should be applied in the early morning or evening to avoid harming beneficial pollinators and prevent leaf burn from the sun.
Seed Starting, Germination, and Seedling Management
Growing from seed offers access to unique plant varieties. Use a light, sterile seed-starting mix of peat and perlite to hold moisture and support young roots. Avoid garden soil for indoor starts, as it can harbor diseases like damping-off which can kill seedlings early.
Place seed trays on a heating mat to maintain soil temperatures between 70-80 degrees Fahrenheit for warm-season crops like tomatoes and peppers. Once seedlings emerge, move them to a bright location with 14 to 16 hours of light daily under T5 fluorescent or LED grow lights. Keep grow lights 2 inches above the seedlings to prevent them from becoming leggy. Keep the soil moist but not soggy, and feed seedlings weekly with a diluted organic kelp or fish emulsion fertilizer once they develop their first true leaves.
Seedlings grown indoors must be hardened off before transplanting outside. Over 7 to 10 days, gradually expose them to outdoor wind, sun, and temperature changes. Begin with a few hours in a shady, protected spot, slowly increasing their exposure to build strong stems and roots.
Raised Bed Gardening: Construction, Soil Layers, and Drainage
Raised bed gardening gives you complete control over soil composition, drainage, and depth. When building raised beds, choose durable, rot-resistant woods like cedar, redwood, or black locust, and avoid chemically treated lumber that can leach toxins into your soil. The ideal bed width is 3 to 4 feet, allowing you to reach the center from either side without stepping on and compacting the soil. The depth should be at least 12 inches to accommodate root crops.
Use organic layering to fill new raised beds. Lay down cardboard to suppress weeds, then add wood logs and branches to create a moisture-holding base. Add layers of dry leaves, green garden waste, and finished compost to support active soil microbiology and build healthy structure.
Fabric grow bags and container gardening are excellent options for urban spaces. Potting mixes for containers should be lightweight and drain well, containing peat moss, vermiculite, perlite, and organic compost. Because containers lose nutrients quickly through watering, feed container-grown crops bi-weekly with liquid organic fertilizers like fish emulsion or compost tea to support healthy growth.
Saving Seeds: Heirloom Varieties and Genetic Resilience
Heirloom vegetables are open-pollinated plants selected over generations for taste and performance. Saving seeds from these varieties preserves their genetic traits. Hybrid seeds (F1) are cross-pollinated for specific commercial qualities, but saving their seed is not recommended as the next generation will be unpredictable, reverting to parent traits.
While hybrid plants can perform well, you cannot save their seed, as the next generation will revert to parent traits and produce unpredictable crops. Heirloom crops offer genetic diversity, helping protect your garden from pests and diseases that can wipe out single-crop plantings. Supporting heirloom seeds helps preserve genetic history and ensures you are growing food that is adapted to your local environment.
Harvest dry seeds directly from dried pods on the plant. For wet seeds like tomatoes, scoop them out and let them ferment in water for 3-5 days to dissolve the gel coating and eliminate pathogens. Dry them on paper or coffee filters, and store them in airtight containers in a cool spot to keep them viable.
Brewing FAQ
What should compost tea smell like?
It should have a sweet, earthy scent. A foul or sour odor means it has gone anaerobic and must be discarded.
Can I store brewed tea?
No, apply the tea within 4 hours of turning off the aerator to prevent the microbes from running out of oxygen.
Final Recommendations for Success
Applying freshly brewed compost tea introduces active biology to your root zone and helps drench leaves to shield them from diseases. Apply it in the early morning to protect microbes from UV rays. Clean your brewing equipment thoroughly after use to prevent harmful pathogen buildup.
DHIDEE AGRO Field Notes
Tracking your garden’s progress is key to managing a successful backyard agriculture setup. Record planting dates, weather observations, first harvests, and any pest or disease issues. This historical data helps you plan crop rotations and manage your soil amendments next year.
Caring for your soil biology is a continuous task; apply finished compost twice a year and protect the soil surface. Turn the pile to add oxygen, check that the core temperature rises enough to destroy weed seeds, and apply compost to your beds before each planting season to maintain soil health.
Stay patient, observe your plants, and enjoy the rewards of growing your own fresh, organic food. This reduces pest pressure, supports healthy pollination, and builds a resilient backyard ecosystem that produces fresh food for your table.
Essential Garden Maintenance Checklist
- Soil: Covering your garden beds with organic mulches is a critical soil-building task. Mulch keeps the root zone damp and feeds the soil organisms as it decomposes. Additionally, a thick mulch layer acts as a barrier that prevents weed seeds from germinating and competing with your vegetable crops for water and nutrients.
- Watering: Apply water directly to the soil using drip lines or a soaker hose. Deep watering once or twice a week supports deep root growth and prevents evaporation. Overhead sprinkler watering should be avoided, as keeping leaves wet for long periods increases the risk of fungal blight and other diseases.
- Pest Patrol: Daily observation is your best pest-control tool. Check the undersides of vegetable leaves regularly to identify and manage pest issues before they spread. Identifying beneficial insects, such as ladybug larvae or lacewings, is also important so you do not accidentally target these natural predators.
- Fertility: Add compost to your beds twice a year to maintain optimal nutrient levels. Finished compost builds soil carbon and keeps plant biology active. This organic amendment acts as a slow-release fertilizer, releasing key minerals as the soil microbes break down the carbon compounds.
- Harvesting: Harvest your vegetables in the early morning when they are at their peak moisture and flavor. This extends their shelf life and preserves their nutrients, keeping the taste fresh.
- Pruning: Prune sucker growth and lower yellowing leaves on tomato plants to focus energy on fruit production and improve airflow through the foliage.